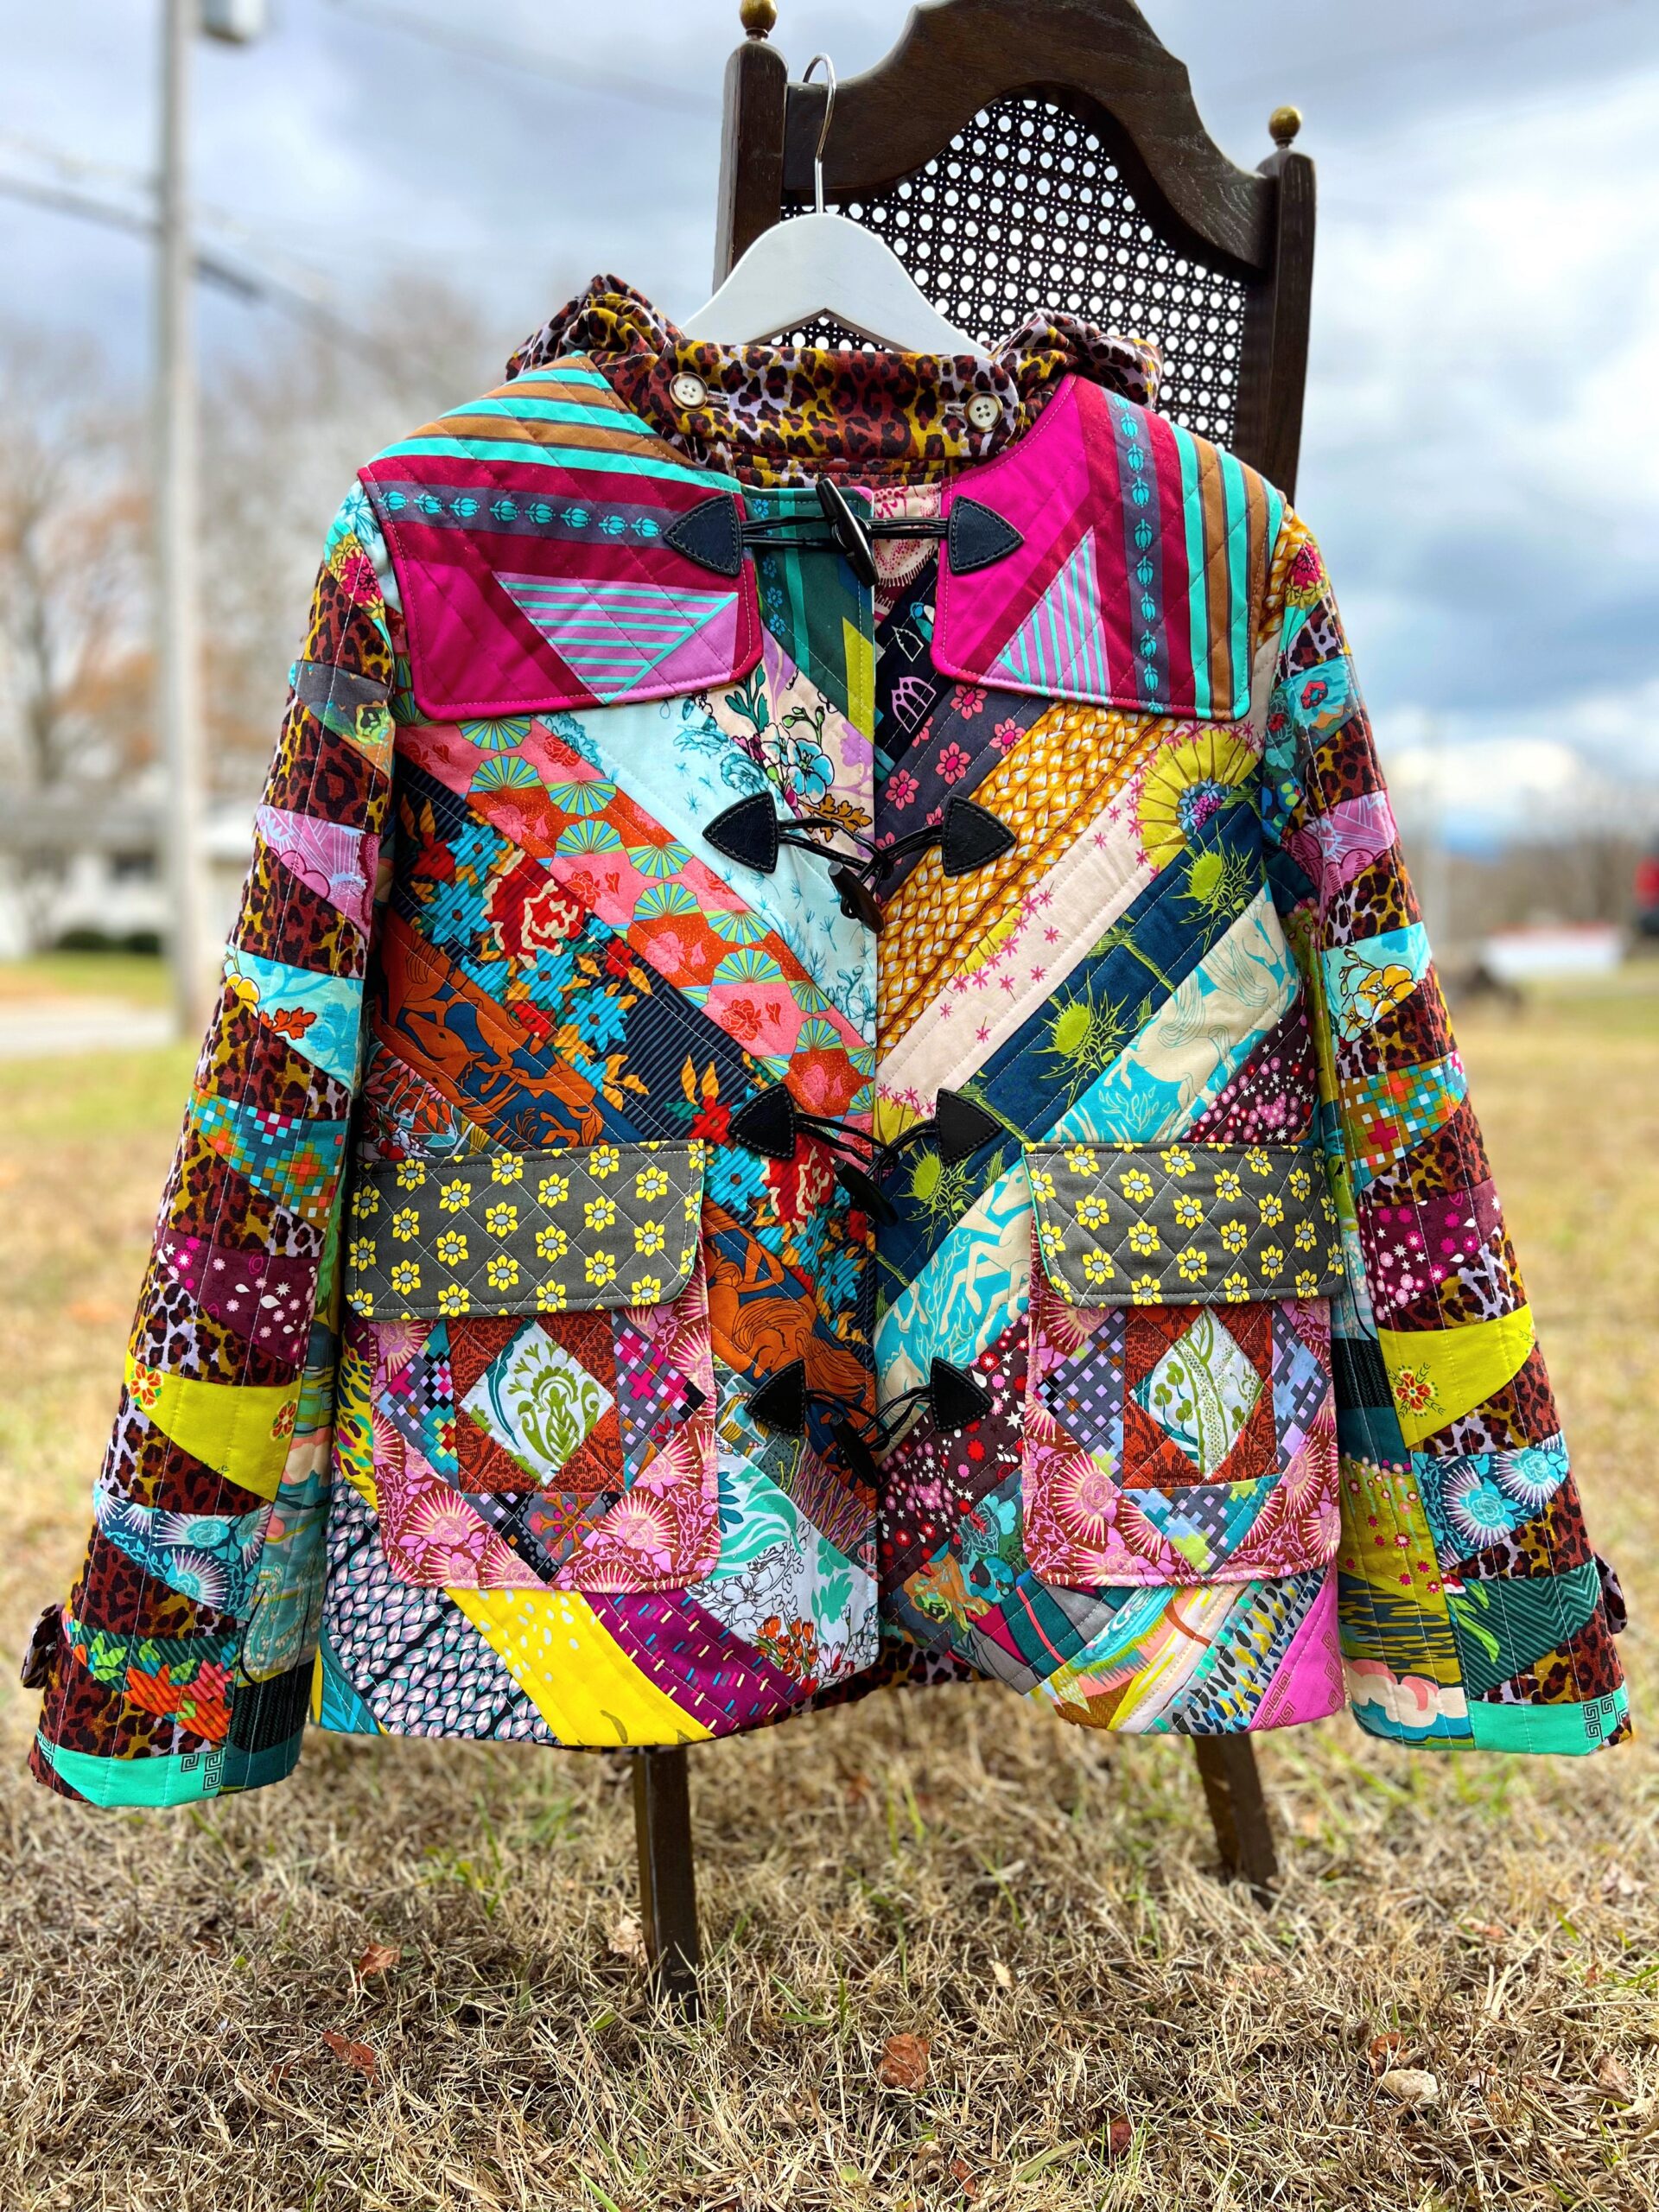
I love days like this

Its day’s like this that I wish would last forever! The beginning of last week started out slow. I knew I was dedicating the week to doing something with Alison Glass‘ debut line, Lucky Penny. And since I am entirely unwilling to waste fabric under any circumstance, I ruminated on what I would do with those lovely fabrics for days. On Thursday, the perfect idea hit me right over the head and sent me into super speed mode trying to make my vision a reality. By Friday, I had made a good start. Here’s the beginnings of my Lucky Penny quilt inspired by the Circle print from Alison’s upcoming line, Clover Sunshine:

IMG_4

Like I said, this is merely the beginning. This quilt will incorporate so many elements, including quite a bit of handwork. I’m bubbling with excitement over this one!

On Thursday, I also received my order from Hawthorne Threads. With those fabrics I was able to make a new Staple Dress, and a new ironing board cover after getting that start on the Lucky Penny quilt.

IMG_3

My newest Staple Dress in Field Study rayon!

IMG_2New ironing board cover in Field Study quilting weight cotton. So bright and cheerful!

And I managed to do two loads of laundry and clean my kitchen! Can I please get days like that more often?!

Today Emilee, Layla, and I took little girls trip. I picked up this fabulous Vintage Vogue pattern to try out. This 1957 pattern costs $27.50 today (although I scored it for 40% off). Would not my grandmother roll over in her grave if she saw that price? I know she would. Guaranteed. Oh well. If I love it, it will be worth it! I just hope I can figure out the measurements, because clearly the women of the fifties were much smaller than the average woman today. What did they eat?!

IMG_1

So be sure to check back. I’ll be posting lots of updates! Have a great day!

-Meredith


Me and Lucky Penny

I decided last week that the whole of this week’s crafting would be devoted to Alison Glass’ debut line, Lucky Penny. After pulling some Lucky Penny and coordinating solids, I thought and looked about for the perfect inspiration. I sketched. But nothing was amazing enough for me to cut into the fabric.

IMG_1 (27)

All of that changed today when Alison gave the world a sneak peek of Clover Sunshine.

Clover Sunshine

Immediately I fell head over heels. I truly haven’t been this excited about a new fabric line in a long time! The colors are incredible.

The circle print is my very favorite, and is the one that lit the spark of inspiration in me. She’s good, isn’t she? A print from her unreleased line is my inspiration for how I’m going to use Lucky Penny.

I have gotten started on the project, but I’m not sharing anything yet! I can tell you it will incorporate many different sewing methods and fibers. And I’m completely excited about it!

Now go on over to Alison’s blog and read up about Clover Sunshine, and her inspiration behind the line. Also, check out Sun Print, her stellar line of 54 basics that will be releasing in shifts this year.

Sun Print


The feathers are my favorite! I will own all of them! You can also check out two new free quilt patterns she has available. There are so many wonderful things coming from the world of Alison Glass in 2013! I’ll be sure to keep you posted on everything I’m doing with her fabrics.

-Meredith

The Staple Dress #1 : Field Study Rayon

I couldn’t hold out anymore. The more I saw the Staple Dress on my IG feed, I knew I was going to have to give this pattern a try.

I’m so glad I did because I love it!!!! The Staple Dress is an incredibly versatile (and very well-written) pattern by April Rhodes. Because I’m really unsure of how I feel about a dropped hem, I went with the straight hem. I don’t have the legs to pull of a dropped hem. And I’m 23. That’s too old for a dropped hem, right? I’m so overthinking it!

IMG_1 (25)

As with any garment, I made muslin version to begin with. And like any other pattern, I was able to use that version to modify the pattern to make the perfect just-for-me dress! After looking at the measurements, I was sure I would need an XS on top, but graded the pattern to be S on bottom just in case. I realized that the XS would be fine on bottom too, so I cut down the pattern to be even.

IMG_1 (26)

After sewing in some shirring, I realized that even with several rows and steaming and all that jazz, I wanted the dress to cinch more in the waist. So I cut down the pattern piece at the shirring line. I marked 1″ in on the pattern piece and curved it from the sleeve bottom to the bottom dot to cut in the waist size. I then cut that piece out and used it as a guide to repeat the same curve on the back piece.

IMG_1 (24)

I did exclude the pockets because I was afraid they would be too obvious under this lightly colored fabric. I used french seams, which I adore because of their clean appearance. The only other modification I made was shortening the dress. I used a 2″ hem to bring the dress just above my knees.

20130513-DSC_0557

I sewed in six rows of shirring. There was some initial frustration with this new skill, but I think I kicked its butt. Once I was able to do it successfully, I didn’t want to stop!

20130513-DSC_0572

I’m thrilled those little changes made the dress absolutely perfect for me! I made my first wearable version in Field Study rayon that I had set aside. It was certainly different to work with, but I just LOVE the drape and the feel of the fabric. With summer weather in full force around here, I’ve been yearning for a really simple not-very-dressy-dress to throw on any day for anything. I adore my My Belle dresses, but they are far too beautiful to be worn on an everyday, any day basis. Those are reserved for church, work, dates, and the like. The Staple Dress is just what I need for running errands and taking Layla to the pool and just about anything else.

20130513-DSC_0585

I can’t believe how much I’ve come to love garment sewing. It has quickly become a love and obsession for me. And I love that every time I finish something, Justin tells me how much he loves it. That may seem lame, but for me its big. He even helped me look through pages of fabric online to use for my next Staples Dress(es). And believe me, there will be more. Many, many more.

Olivia wishes you a happy Monday!

20130513-DSC_0591

20130513-DSC_0623

Thanks for stopping by!

-Meredith

Feather cutting tutorial + Giveaway!

Hey there! I’ve got lots to talk about today. We’re starting off with a tutorial for sewing and cutting feather halves to minimize waste using Anna Maria’s Feather Bed Quilt pattern. Then we’ll have a chat about my second experience with Art Gallery fabrics, and we’ll finish off with a giveaway.

Ready?

Okay!

Feather Sewing + Cutting Tutorial

In Anna’s pattern, she calls for making feathers using the whole width of fabric. That’s perfect if you have lots of full width fabric, but many times, we tend to purchase fat quarter bundles. My first time making this quilt I had only scraps to work with! So I had to come up with some way to maximize the amount of feather halves I was getting with each set. When I made my Field Study version, I did have full width of fabric on hand, but chose to use 22″ strips anyway, so I could place them differently and get more variety in my feathers.

Note: if you are participating in Stitched in Color’s String Fever Quilt Along, this is a perfect pattern for you! 

Today I’m using a fat quarter pack of some Art Gallery fabric to demonstrate how you can use smaller pieces of fabric (22″ length) to get just as many feather pieces as using the full width (44″) as demonstrated in the pattern.

IMG_1 (18)

I began by cutting two strips from each fat quarter. My plan was to make a set of seven feather halves for both the right and left sides. In the Feather Bed quilts I’ve made, I cut various sizes of strips from 1.25″ to 3″ x the length (22″).

IMG_1 (19)

Now we’ll start by making the right halves. These will be made using the side of the pattern piece that has the writing. We’re going to be working with the slant of the feather to determine the placement of the strips. Place your bottom strip down, then add a piece above that. Stagger the strips so that you can still see a good 1/4″ + of the second strip where the first and second strips meet.

IMG_1 (20)

Sew with right sides together and using a 1/4″ seam. Press seam upward. Then add a third strip. Use the feather pattern piece as a guide to place the third strip so that you have a good 1/4″ extended past the pattern piece on bottom. Sew together.

IMG_1 (21)

Repeat this step until you have enough strips sewn together to cover the whole pattern piece.

Now its time to cut out the feather halves! Begin by placing the feather pattern piece on the strip block. With a ruler to cover the pattern piece, use your rotary cutter to slice off the staggered edges.

IMG_1 (22)

Flip the stripped piece and cut out your first feather piece.

IMG_1 (9)

Rotate the pattern piece so that the bottom edge is on the top side of the piece, and cut another feather half.

IMG_1 (23)

Repeat until you have six or seven right side feather halves. (I can almost always get seven out of 22″ strips.)

IMG_1 (8)

Now we’ll move onto the left side feather halves, where we’ll just be reversing everything we just did with the right sides.

Begin by turning your feather pattern piece to the blank side. Using that as a guide, place your strips, staggering them according the the slant of the pattern piece.

IMG_1 (10)

Continue to sew strips together until you have enough to cover that pattern piece.

IMG_1 (11)

Now cut off the staggered edges using a ruler, the pattern piece (blank side!), and rotary cutter.

IMG_1 (12)

Cut out your first feather half.

IMG_1 (13)

Rotate the pattern piece each time! Top then bottom, then top, then bottom… until you have seven left side feather halves!

IMG_1 (16)

See how little waste this method leaves you with?!

IMG_1 (15)

It takes a little more time having to pause in between sewing strips, but the difference in the amount of waste is astronomical. Plus, every time you do a stripped section, you’ll gain speed. You’ll have to let me know what you think of this method!

Now for my little Art Gallery blurb: As I said, this is second experience with Art Gallery. After talking to a friend about my hangups with the brand, she sent me a little fat quarter pack so I could give it another chance. My opinion hasn’t changed. I do think it sews much better with other Art Gallery, but to me its still far inferior to brands such as Free Spirit, Andover, or Moda (and more). The fabric itself is almost “cheap” to touch. I’ve heard people compare it to voile, and I think that is just ridiculous. Its not at all like the voile I’ve used, which is finely woven yet quite durable. I really wanted to change my mind about it! The new stuff they are coming out with is so richly colored, and the designs are beautiful. But the fabric does not do those designs any justice.

I’ve made a few Feather Bed Quilts now. I’m on my third at the moment, which I hope to share with you soon. I LOVE this pattern. If I keep going at this rate, I will be the Katy Jones of the Feather Bed Quilt. But the pattern really is that good. If you’d like to give it a go, you can check out the free pattern here. Anna Maria is my fave. Seriously, who can compete with her?

I’d love for more of you to give this pattern a try! So I’m giving away these feather halves I’ve made, and the remainder of the fat quarter pack. All you need to do is leave a comment on this post and I’ll pick a winner sometime next week. Just be sure you’re determined to make the quilt before entering! US only, please.

IMG_1 (17)

I hope this has been helpful! Have a great weekend!

-Meredith


“Y” Embroidery

My “Layla” embroidery collection has grown by one letter, the “Y”. This was such a fun letter to do!

IMG_1 (6)

I love the flowers and seed stitching best.

IMG_1 (7)

But to be totally honest, I’m not sold yet. The “a” is the best looking letter thus far, so I’m hoping the last two letters will tie it all together, and make the “L” and the “Y” look a bit better once they are all together.

IMG_1 (5)

I know I’m probably just being overly critical, but I think my biggest challenge was finding stitches and colors that would tie five different fabric wrapped canvases together. I don’t think I’ve mastered it at all, but again, I’m hoping the final “l” and “a” will look so good, that the whole series will look great.

We shall see! Come back tomorrow for my feather cutting tutorial that will minimize waste!

-Meredith

Wednesday

So it’s Wednesday. I’ve been doing a lot today. First, I tackled the weeks worth of dishes that was taking over my kitchen. I hate doing dishes!!! After that I did a little work from home. Then Layla and I went to swimming lessons. She was not cooperating, but the lifeguards were kind enough to work with her one on one after the other kids were done with their lesson. I never thought my kid would be that kid, but alas, even the good kids have hard times with obedience. She is fiercely independent. Like her mother.

When we got home, the two of us decided we should try to weed our yard. I should note here that our whole yard is made up of weeds. There is no grass. Even though I’ll just be looking at dirt once the weeds are gone (if that ever happens) the weeds just need to go. Maybe our landlord will give us grass once they realize all the green that was there were weeds. :) Here’s the pile of weeds so far. I had to stop because I kept blacking out.

IMG_1 (4)

I’ve always wanted to be able to garden, but I’m that person that has the ability to kill any plant. My neighbor with a green thumb helped me plant some geraniums. I was drawn to them because they look similar to hydrangeas, which are my most favorite flower but do not grow in Florida even for people who can keep anything alive. I’ve managed to keep the geraniums alive for nearly a month. Maybe I’m having a turn around? I do hope they will live!! The picture is super off color because the sun is so bright.

IMG_1 (3)

Layla and I have also been working on casting on. My very sweet friend put together this knitting kit after finding out about Layla’s interest in learning to knit. She (my friend) is a knitting genius, so I’m thrilled to be able to learn from her! She sent the most beautiful yarns for us to work with. Here’s the latest look at our progress.

IMG_1 (1)

Layla’s attention span is super short, so we work on it here and there. This is our fifth attempt which is far more even than our other practice sessions. We’re improving!

I’ve also had this dress on my mind.

IMG_1

I bought the pattern and I’m thinking of using some of my Field Study rayon challis. I need to made a muslin first, because I may have to go bigger on the bottom half of the dress. I’ll keep you posted on that!

Last but not least, I’ve gotten back to my “Layla” embroidery. Its become my handwork project since finishing my Centerpiece needlepoint and the Feather Bed quilt. I’m working on finishing up the “Y” which will hopefully happen tonight. Then I only have the “l” and the last “a”! I really should have finished these ages ago.

IMG_1 (2)

Thank you so much for all your kind comments about my Feather Bed quilt! Many of you expressed interest in a cutting tutorial. I’ll have that up by the end of the week, so check back soon!

Have a beautiful evening!

-Meredith


A Feather Bed quilt just for me!

Justin bought me the Field Study collection in quilting weight for Christmas. After waiting until Christmas to get the line, I don’t know why it took me so long to cut into it! It beckoned me day after day, until finally I could devote my full attention to it. I knew I wanted to make a Feather Bed quilt for myself after sending this one off to my dear friend, so I set off making feather halves. A little note here: I can get seven feather halves out of every 22″ length of fabric because I stair-step the lengths as I sew the strips together, which leaves virtually no waste. Would it be helpful for me to post a tutorial on how I make the most of my feathers?

This quilt is 54″ x 72″, and it is the perfect couch lounging size!

20130503-DSC_0010-2

Anyway, I got the top sewn up, and spent the past week or so hand quilting. I really took my time on this part because I just love the relaxation of the activity. I used several colors of Perle 8′s to quilt around each feather, which adds some fun pops of color against the very white background. And I used a Perle 8 the same color as the stems to quilt each stem.

20130503-DSC_0019

I spent the past few days sewing on the binding. I’m the world’s slowest hand binder! But I will always do it that way because I cannot stand machine binding. I’m not trying to be catty, but its just one of my things.  I may be black and white to a fault. The binding is voile just like the backing. So. Stinking. Soft.

20130503-DSC_0011

Emilee, Layla, Olivia, and I went out to Boca to get some pictures of my new quilt! Emilee does the best job ever taking pictures of my really special projects. I don’t like to take pictures of some items, because I know only she can do them justice.

20130503-DSC_0016-2

My new Feather Bed quilt has already been put to good use. I cannot describe to you how amazing voile backing is. I really will have a hard time using anything else because it is so dang soft!!! And light. It is insanely lightweight, which is deeply appreciated in humid and hot Southwest Florida.

20130503-DSC_0014-2

Justin and I put together a movie watching area on the floor last night. We covered the rug with a quilt then covered that with pillows and covered ourselves with the Feather Bed quilt. We are dorks. But I’m just letting you know this quilt is perfect and is already getting constant use.

Have a great Monday!

-Meredith

Art Student Tote

I’ve been using a tote from Target as my everyday bag for quite some time. It used to be a lovely mustard color, but is blue tinted now thanks to my super dark jeans that dye everything they come into contact with. Besides its generally ratty appearance, the button ripped right out of it, rendering it completely useless to anyone who would care at all about their appearance. So Saturday evening after work I knew I needed to get out my Art Student Tote pattern from Anna Maria and make myself a replacement everyday bag.

20130429-DSC_0018

Its worth noting that for once I had every single material I needed to complete this bag on hand with zero planning involved. This is a first and probably the only time that will ever happen. So there. It has been recorded.

20130429-DSC_0012

I ordered two half yards of Anna Maria’s new linens to sample, and I was able to use one of them for the exterior of the tote! How awesome is that? I used a great basic print from LouLouThi for the trim and interior of the bag.

20130429-DSC_0017

The straps took a really long time to make, but I didn’t care at all because Layla went to bed at her usual 7:30 bed time and Justin went to bed shortly after and I had the whole night to myself. IT ROCKED! I think I was able to complete the whole bag from cutting to finishing in only three hours.

20130429-DSC_0003

I just love this bag! In my tired state, and even though I read through the directions prior to beginning, I still managed to have a mess up. I boxed the corners that were not supposed to be boxed! After a little Instagram pep talk with some friends, I was assured that boxing the corners was actually better for the bag if I wanted more room. So even though I made a mistake, I am very happy with the way the bag has turned out, and I would box the corners again if I could have a do over.

20130429-DSC_0011

and here’s Layla asking Aunt Emilee to take a picture of her lollipop

20130429-DSC_0006

That’s all for today! I’ve got to get back to quilting the stems on my Feather Bed Quilt! I’m growing impatient to use it.

Have a good evening!

-Meredith

Goings On

I’ve been working away on my Feather Bed quilt. I’m one feather away from being halfway done with quilting around the feathers. After that, I’ll quilt the stems. I’m not sure if I’ll add any more quilting after that, but I’ll be sure to let you know. I’m thinking I’ll be so anxious to use it, that I won’t bother with any more quilting once the feathers and stems are completed.

Another project I’ve picked up in the past week is knitting. This is my second ever attempt. I’m just practicing my knitting and purling and trying to develop an even tension. Its very new, and you can see all the tension issues in this picture. I’m going to keep working at it, though! My three year old is very ready to learn how to knit. It’s become a daily topic for the two of us. She wants to learn, I don’t know how…so Mom’s got to learn in order to teach child.

knitting

Emilee and I took a trip to J.Crew and Anthropologie. Its always a special trip when we go since the closest these stores are to us is an hour and a half away. I bought this handpainted mug to serve as a companion to my owl cookie jar. They seem quite happy together.

owl buddies

Speaking of Anthropologie, I’ve had my eye on this amazing rug for more than a year. When it went on sale, Layla (okay, Justin actually) decided I should have an early Mother’s day present. I’ve had it gracing the floor of the living room for about a week now, and I am still gushing over it! I LOVE it! I’ve been wanting to do some redecorating in that room for some time, and this was a perfect place to start. Next up will be some Field Study linen curtains followed by an antique couch reupholstering.

rug

I’m going to get back to work on my quilt! Have a great afternoon!

-Meredith

Progress Report : Field Study Feather Bed Quilt

Hey there! So I’ve gotten back to working on my Field Study Feather Bed Quilt. Last night I finished piecing together the blocks, and I was able to trim them and assemble the quilt top today. I’ll be riding this wave of excited motivation for as long as I can.

basted

yucky picture. boo!

After piecing together the top, I had to immediately baste it because for once, I actually had the backing and binding already here! That does not happen. Like ever.

basting closeup

I’ve been planning on backing the quilt in a Field Study voile since before I even began the quilt, and its getting voile binding too!

voile backing

I don’t have any pictures to show you yet, but I’ve also been able to get a jump start on the hand quilting, and I’ve gotten through about a quarter of the feathers today. I’m ridiculously excited to get this one finished and put into daily use!

Perle Cotton

I can’t wait to show you the finished quilt!

-Meredith