
 We have made it to part two of the Shift a long! Have you designed your layout and purchased your fabric? (do remember to tag them so I can see! #shiftquilt and #shiftalong) Today we are going to talk about the cutting process. I’ve streamlined it through much practice, so I hope that will be beneficial to you. I have actually switched up the featured quilt for this week, choosing to focus on the most complex version for the cutting.
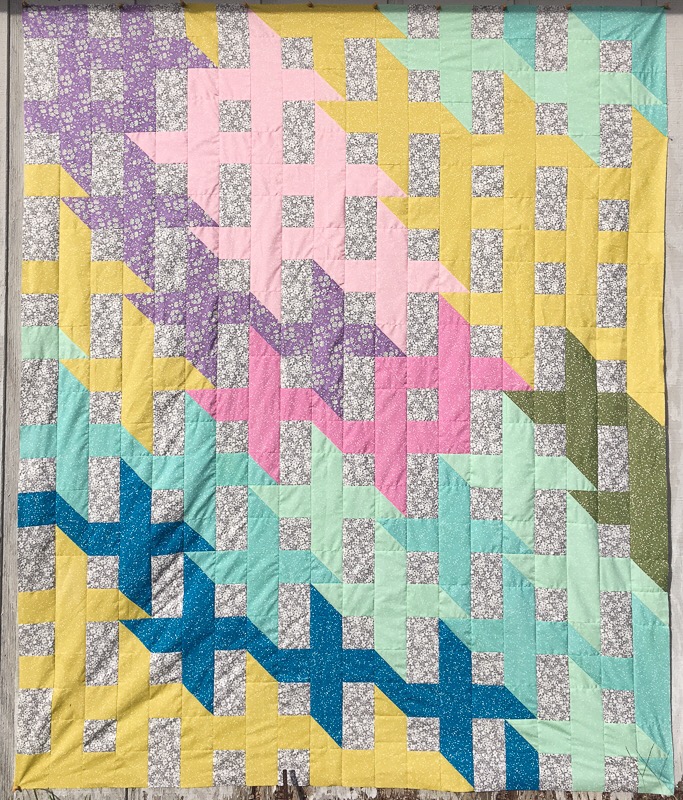
My vision for this quilt started with a photo of a beautiful woven work. From there I chose some colors from Hawthorne Threads‘s Stardust and Forget Me Not collections (and incidentally, I forgot to include the purple, so I pulled one from my stash). The fabrics I used are as follows: Stardust in Zest, Succulent, Seaglass, Carnation, Wisteria, Olive, Peacock, and Forget Me Not in Smoke.
I then began to arrange the colors on my coloring sheet (included with the pattern). This is a crucial step because it helped me to determine with accuracy just what I needed to cut.
Before I get into the process for this particular quilt layout, I want to emphase this: if you have a consistently patterned layout (if the number of fabrics to number of x’s is pretty consistent), you can very easily get a good estimation of what to cut right in that center page diagram by dividing # of needed prices by # of fabrics. If you end up with a decimal amount, just round UP to the nearest whole number. 
Now, I’m going to explain my method used for this particular layout. You can see clearly that there is no consistency between the number of fabrics and number of x’s. I have quite a lot of Zest and very little Olive, Carnation, and Wisteria. So to avoid waste I used my coloring diagram to count exactly how many I needed of each cut from each color.
Example:
Size: 9.5×3.5 3.5×3.5 6.5×3.5
Zest 12 31 3
Succulent 6 13 1
Seaglass 7 15
Carnation 5 10
Wisteria 3 6
Olive 2 3
Peacock 4 10
Periwinkle 5 11
Easy peasy. It does take a little longer but at least you know exactly what is needed from each fabric, totally doing away with waste. I’d much rather do more planning than end up with fabric I don’t know what to do with. .jpg)
Now we need to account for the half square triangles that allow those x’s to Shift between rows. To do this (and again, this method applies to a random, inconsistent layout), I began with one color and counted all the HST pairings with each joining color. You can see in the following picture the way I did this until I had accounted for each color pairing. 
To determine how many 4″ squares I needed from each fabric, I simply added the total number of HSTs per color and divided by two (rounding up in the case of an odd number). This is what was needed from each color:
Example: 4″ squares
Zest 23
Succulent 14
Seaglass 8
Carnation 6
Wisteria 5
Olive 2
Peacock 9
Periwinkle 9
And that’s all the counting there is! I used a single print for the background so I just cut the whole amount listed in the diagram. If you are using a variety, just divide the total by the number of fabrics and you’ll be on your way. 
Now for a bonus bit of brainwork I thought you might appreciate, I have included a little chart dividing the number of pieces you can get on a width of fabric cut. I find it most efficient to cut 3.5″ strips (for the throw size) and layer a few of them before cutting them down to the individual sizes.
Examples are for 44″ width of fabric
Baby quilt: (working with 2.5×44″ strips, except last row which is 3×44″)
6.5″ : 6 2.5″ : 17 4.5″ : 9 3″ : 14
Throw quilt: (working with 3.5×44″ strips, except last row which is 4×44″)
9.5″ : 4 3.5″ : 12 6.5″ : 6 4″ : 11
Queen quilt: (working with 4.5×44″ strips, except last row which is 5×44″)
12.5″ : 3 4.5″ : 9 9.5″ : 4 5″ : 8.jpg)
You should be all set to cut out all your fabrics this week! Be sure to post pictures on instagram. Tag me @thefooshe and use #shiftquilt and #shiftalong.jpg)
It’s not too late to join in! Remember at the end of November we will do a link party with all the finished tops (you do not have to finish the whole quilt) and a big winner will be drawn on December 5. This week’s featured sponsor is Hawthorne Threads and they are offering up a $30 gift card to their very expansive shop as part of the grand prize! I also want to send out a huge thank you to them for allowing me to work with their vibrant, in house collections. I’ve used many, many of their fabrics printed right there in their studio, and they do such a stand up job. Every collection seems better than the last, and they offer such a huge array of colors in a variety of basics. The Stardust and Forget Me Not collections were perfect for the not-quite-solid look I was hoping to achieve. So thank you, Hawthorne Threads!! .jpg) As always, please feel free to reach out with any questions. Comment right on this post or tag me with questions on Instagram. I’m here to help and encourage!
As always, please feel free to reach out with any questions. Comment right on this post or tag me with questions on Instagram. I’m here to help and encourage! .jpg)
Thanks for stopping by!
-Meredith

Thanks for the tips. The pattern was a little confusing as it’s written. Thankfully I’m using only two main colors and won’t have to math too much.