.png) Hey everyone! I’m back from a long week away from the blog. I’ve got much to cover and a new tutorial for you. This week is the final week of projects in the Holiday Craft Bash! I can’t believe we’ve been at this for more than six weeks already! I do hope it has been fun for you and that you have been able to prepare your home for the holidays along with us.
Hey everyone! I’m back from a long week away from the blog. I’ve got much to cover and a new tutorial for you. This week is the final week of projects in the Holiday Craft Bash! I can’t believe we’ve been at this for more than six weeks already! I do hope it has been fun for you and that you have been able to prepare your home for the holidays along with us.
Today I’m going to show you how to make my Christmas Table Runner. Totally a boring name, but a really fun project that you can complete in just a couple of hours!
.jpg)
Here is what you will need:
– 27 2.5″ assorted squares
– 2/3 yd muslin (or some solid color for the background)
– 1/2 yd for backing
– 1/4 yd for binding
– 18″ x 42″ batting
To get started, cut your muslin or solid background color into the following:
– 18 2.5″ squares
– 8 10.5″ x 2.5″ strips
– 2 14.5 x 2.5″ strips
– 2 34.5″ x 2.5″ strips
Layout your design to this effect: (ignore the x’s)
.jpg)
When you are happy with your layout, you can begin sewing your squares into rows. Sew together the squares vertically so that you are sewing 9 total pieced rows with 5 squares in each row. Press as you go.
.jpg)
Once you have pieced your rows with squares, sew the 10.5″ x 2.5″ strips in between each of the nine rows so that you end up with seventeen rows sewn together (9 pieced, 8 plain).
.jpg)
Now sew your 35.5″ x 2.5″ strips to the long ends of your pieced section. Then sew on the 14.5″ x 2.5″ strips onto the shorter ends of the pieced section.
You’ve completed the top! Now its up to you baste your top, batting, and backing and decide what you want to do concerning the quilting. You can quilt as much or as little as you like. I stuck with handquilting since that is what I’m most comfortable with. I stitched on little red x’s as cornerstones, then used an ecru Perle cotton to stitch rows inbetween the squares.
.jpg)
.jpg)
Once you have finished up the quilting, you can trim up your sides so that the batting and backing are even with the top. Stitch on your binding, and your table runner is ready!
.jpg)
.jpg)
Don’t forget to check out all the other projects from this final week of the Holiday Craft Bash!
Debbie made this beautiful table runner:
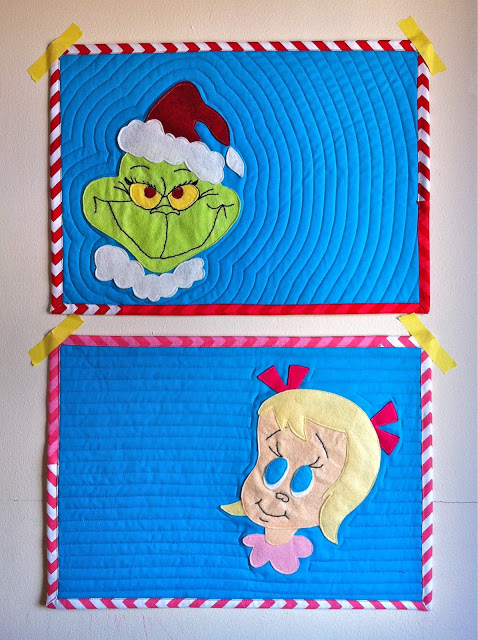
Jessica made some unbelievably cute Grinch themed placemats! I must make them!
Jacey made this gorgeous Zig Zag table runner. Her tutorial will be up tomorrow.
.jpg)
Remember to add any projects you have made with our tutorials in the Flickr group.
Thanks for stopping by!
-Meredith

.jpg)


Great table runner, Meredith! Isn’t thinking up the name the hardest part :)
Those little red x’s are the perfect touch!
I agree with Debbie; the little x’s are the best! Thanks again for including me on this shindig! xo
[…] Christmas Quilted Table Runner Tutorial […]